
Hello, I am attempting to create an arrival to receive a Purchase Order line via REST API. I am inspecting the endpoint calls that Aurena makes during the process, but i’m unable to figure out which call is actually performing the receipt. I see calls to CreateReceiptSet but the payload doesnt include the information from the arrival line (PO #, Line, Etc). I also see CreateArrivalReceipt, but it only uses what i assume is the OBJKEY that is returned from CreateReceiptSet. I know this is a little tricky because an assistant is involved, but I cant seem to make sense of the calls that are happening. Any tips for figuring out how this assistant works?
- Community
- IFS Solutions
- Framework & Experience (Infrastructure, Cloud, Integration, Dev Tools)
- Create arrivals via REST in IFS Cloud
Solved
Create arrivals via REST in IFS Cloud
- February 29, 2024
- 12 replies
- 824 views
- Sidekick (Customer)
Best answer by Marcel.Ausan
https://xxxxxx-uat.ifs.cloud/main/ifsapplications/projection/v1/CreateReceipt.svc/CreateReceiptSet(Objkey='128F5FFCF77CAF0BE0632562F20A1D4A')/ReceiveLines?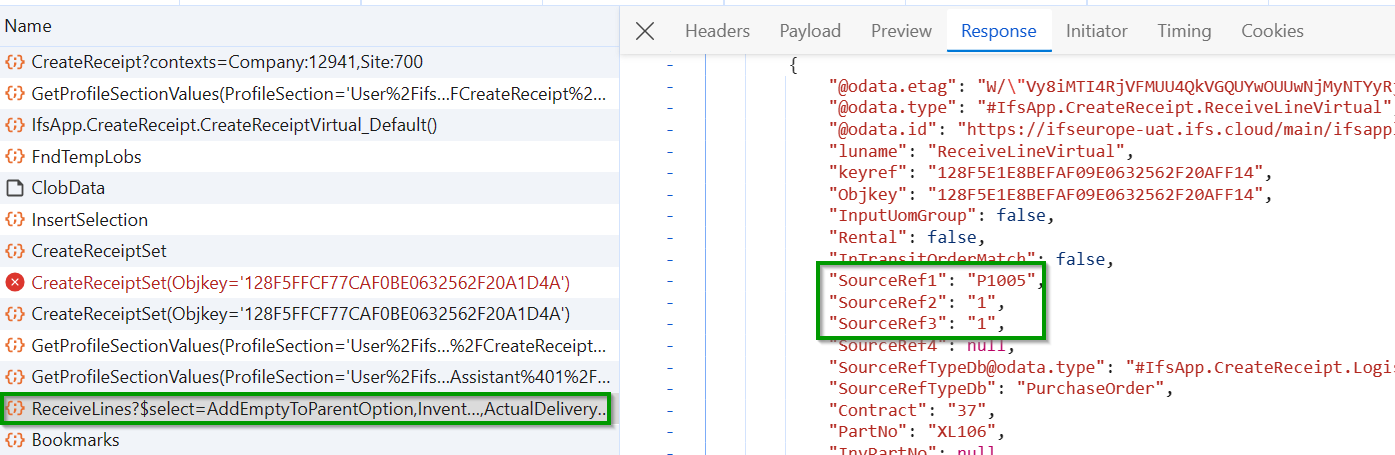
And then a few calls below is a POST that does the actual receipt based on Objkey:
https://xxxxxxx-uat.ifs.cloud/main/ifsapplications/projection/v1/CreateReceipt.svc/CreateArrivalReceipt

Payload:
{ParentObjkey: "128F5FFCF77CAF0BE0632562F20A1D4A"}
So, I would say that based on your Source Ref 1 / 2 /3 / 4 you need to get the Objkey and then call CreateReceipt.svc/CreateArrivalReceipt
12 replies


- Hero (Employee)
- February 29, 2024
Hi
It’s quite interesting how IFS assistants work 😀, The workflow behind editing fields in an assistant involves several HTTP requests, beginning with a POST API call to create a record in a temporary table when a field is first edited. Subsequently, a series of PATCH requests are made to update the initial record created. Each request returns the objkey of the corresponding record in the temporary table. Upon completing the assistant, a separate POST request is sent to a different endpoint, often labeled as "finish" or "create".Usually objkey returned from the previous requests is passed as a parameter in this final request. This objkey serves as a reference to the edited record in the temporary table and ensures that the changes made during the assistant's interaction are properly captured and processed.
/Trewon
- Author
- Sidekick (Customer)
- February 29, 2024


 +22
+22- Ultimate Hero (Partner)
- Answer
- March 1, 2024
https://xxxxxx-uat.ifs.cloud/main/ifsapplications/projection/v1/CreateReceipt.svc/CreateReceiptSet(Objkey='128F5FFCF77CAF0BE0632562F20A1D4A')/ReceiveLines?
And then a few calls below is a POST that does the actual receipt based on Objkey:
https://xxxxxxx-uat.ifs.cloud/main/ifsapplications/projection/v1/CreateReceipt.svc/CreateArrivalReceipt

Payload:
{ParentObjkey: "128F5FFCF77CAF0BE0632562F20A1D4A"}
So, I would say that based on your Source Ref 1 / 2 /3 / 4 you need to get the Objkey and then call CreateReceipt.svc/CreateArrivalReceipt
https://www.linkedin.com/in/marcelausan/

- Sidekick (Customer)
- December 4, 2024
- Author
- Sidekick (Customer)
- December 4, 2024
- Sidekick (Customer)
- December 4, 2024
Thanks,
- Author
- Sidekick (Customer)
- December 4, 2024
Hi
Disclaimer: I am self taught, and this is the result of hours of trial and error, so no promises.
Note: I’ll list all of the endpoints as projections, so for instance, the CreateReceipt.svc full path would be: https://[yourIFSserver]/main/ifsapplications/projection/v1/CreateReceipt.svc
Step 1: Build the CLOB data for the PO Line being received:
This is a long text string that is delimited by “^” characters, and includes a lot of the data for the line. Here’s an example of one:
["SOURCE_REF1=T12345^SOURCE_REF2=1^SOURCE_REF3=1^SOURCE_REF4=^SOURCE_REF_TYPE_DB=PURCHASE_ORDER^SOURCE_QTY_TO_RECEIVE=1^INV_QTY_TO_RECEIVE=1^CATCH_QTY_TO_RECEIVE=^LOCATION_NO=^LOCATION_TYPE_DB=^LOT_BATCH_NO=T12345-1-1^ENG_CHG_LEVEL=1^WAIV_DEV_REJ_NO=*^CONDITION_CODE=^RECEIVE_CASE=ReceiveIntoInventory^SOURCE_QTY_TO_INSPECT=0^QC_CODE=^NOTE_TEXT=^ORDER_CODE=1^INPUT_QTY=^INPUT_CONV_FACTOR=^INPUT_VARIABLE_VALUES=^PART_COST_LEVEL_DB=COST PER LOT BATCH^PACKING_INSTRUCTION_ID=^ADD_EMPTY_TO_PARENT_OPTION_DB=^RENTAL_DB=false^MANUFACTURER_ID=^MANUFACTURER_PART_NO=^;"]As you can see, i have entered my PO, Line, Release, Qty, etc into the string. A lot of the options are left blank. I could not find any documentation on this part, I reverse engineered this string from watching the calls happening in real time.
Step 2: POST request to CreateReceipt.svc/FndTempLobs to begin the process
Data payload:
{"CreatedByModule": "CreateReceipt"}You will need the ETag and the LobId from the response of this call
Step 3: PATCH request to CreateReceipt.svc/FndTempLobs(LobId='{lobId}')/ClobData
The LobId from step 2 should be substituted into the path above, You will also need to add an If-Match header to your request with the Etag received from step 2.
The body for this request is the text of the CLOB you created in step 1.
Step 4: POST request to CreateReceipt.svc/InsertSelection
Data Payload:
{
    "Source": "RegisterArrivals",
    "SelectionTempLobId": "[LOBID FROM STEP 2]"
}
You’ll need the LineGuid from the response of this call.
Step 5: POST request to CreateReceipt.svc/CreateReceiptSet
Example Data Payload (anything in [ ] brackets must be substituted):
{
  "PrintBarCodes": false,
  "PrintArrival": false,
  "PrintServiceabiliyTag": false,
  "PackingRule": "SingleHandlingUnit",
  "LineGuid": "[LINE GUID FROM STEP 4}",
  "ReceivedBy": "[ADD A USER ID HERE]",
  "ArrivalDate": "[THIS WILL NEED TO BE A TIMESTAMP]",
  "ReceiptReference": "[THIS IS A REFERENCE NOTE]"
}
You’ll need the ObjKey from the response of this call.
Step 6: GET request to CreateReceiptSet(Objkey='[ObjKey from Step 5]')/ReceiveLines
This will return a list of lines on the receipt (i think it should just be one because we’re making a single request). You will need the ObjKey for this line.
Step 7: PATCH request to CreateReceipt.svc/CreateReceiptSet(Objkey='[ObjKey for Receipt from Step Step 5]')/ReceiveLines(Objkey='[ObjKey for line from Step 6]')
Example Data Payload (You’ll need to sub in your own Locations/Warehouse/etc):
{
  "LocationNo": "{{selectLocationNo}}",
  "Warehouse": "{{selectLocationWarehouse}}",
  "BayNo": "{{selectLocationBay}}",
  "RowNo": "{{selectLocationRow}}",
  "TierNo": "{{selectLocationTier}}",
  "BinNo": "{{selectLocationBin}}"
}
You’ll need the ParentObjKey from the response of this call.
Step 8: POST request to CreateReceipt.svc/CreateArrivalReceipt
Example Data Payload:
{
    "ParentObjkey": "[ParentObjKey from Step 7]"
}
If everything works correctly that should complete the receipt of the line.
Hope this helps.


 +6
+6- Sidekick (Customer)
- November 11, 2025
Hi
Disclaimer: I am self taught, and this is the result of hours of trial and error, so no promises.
Note: I’ll list all of the endpoints as projections, so for instance, the CreateReceipt.svc full path would be: https://[yourIFSserver]/main/ifsapplications/projection/v1/CreateReceipt.svc
Step 1: Build the CLOB data for the PO Line being received:
This is a long text string that is delimited by “^” characters, and includes a lot of the data for the line. Here’s an example of one:
["SOURCE_REF1=T12345^SOURCE_REF2=1^SOURCE_REF3=1^SOURCE_REF4=^SOURCE_REF_TYPE_DB=PURCHASE_ORDER^SOURCE_QTY_TO_RECEIVE=1^INV_QTY_TO_RECEIVE=1^CATCH_QTY_TO_RECEIVE=^LOCATION_NO=^LOCATION_TYPE_DB=^LOT_BATCH_NO=T12345-1-1^ENG_CHG_LEVEL=1^WAIV_DEV_REJ_NO=*^CONDITION_CODE=^RECEIVE_CASE=ReceiveIntoInventory^SOURCE_QTY_TO_INSPECT=0^QC_CODE=^NOTE_TEXT=^ORDER_CODE=1^INPUT_QTY=^INPUT_CONV_FACTOR=^INPUT_VARIABLE_VALUES=^PART_COST_LEVEL_DB=COST PER LOT BATCH^PACKING_INSTRUCTION_ID=^ADD_EMPTY_TO_PARENT_OPTION_DB=^RENTAL_DB=false^MANUFACTURER_ID=^MANUFACTURER_PART_NO=^;"]As you can see, i have entered my PO, Line, Release, Qty, etc into the string. A lot of the options are left blank. I could not find any documentation on this part, I reverse engineered this string from watching the calls happening in real time.
Step 2: POST request to CreateReceipt.svc/FndTempLobs to begin the process
Data payload:
{"CreatedByModule": "CreateReceipt"}You will need the ETag and the LobId from the response of this call
Step 3: PATCH request to CreateReceipt.svc/FndTempLobs(LobId='{lobId}')/ClobData
The LobId from step 2 should be substituted into the path above, You will also need to add an If-Match header to your request with the Etag received from step 2.
The body for this request is the text of the CLOB you created in step 1.
Step 4: POST request to CreateReceipt.svc/InsertSelection
Data Payload:
{
    "Source": "RegisterArrivals",
    "SelectionTempLobId": "[LOBID FROM STEP 2]"
}
You’ll need the LineGuid from the response of this call.
Step 5: POST request to CreateReceipt.svc/CreateReceiptSet
Example Data Payload (anything in [ ] brackets must be substituted):
{
  "PrintBarCodes": false,
  "PrintArrival": false,
  "PrintServiceabiliyTag": false,
  "PackingRule": "SingleHandlingUnit",
  "LineGuid": "[LINE GUID FROM STEP 4}",
  "ReceivedBy": "[ADD A USER ID HERE]",
  "ArrivalDate": "[THIS WILL NEED TO BE A TIMESTAMP]",
  "ReceiptReference": "[THIS IS A REFERENCE NOTE]"
}
You’ll need the ObjKey from the response of this call.
Step 6: GET request to CreateReceiptSet(Objkey='[ObjKey from Step 5]')/ReceiveLines
This will return a list of lines on the receipt (i think it should just be one because we’re making a single request). You will need the ObjKey for this line.
Step 7: PATCH request to CreateReceipt.svc/CreateReceiptSet(Objkey='[ObjKey for Receipt from Step Step 5]')/ReceiveLines(Objkey='[ObjKey for line from Step 6]')
Example Data Payload (You’ll need to sub in your own Locations/Warehouse/etc):
{
  "LocationNo": "{{selectLocationNo}}",
  "Warehouse": "{{selectLocationWarehouse}}",
  "BayNo": "{{selectLocationBay}}",
  "RowNo": "{{selectLocationRow}}",
  "TierNo": "{{selectLocationTier}}",
  "BinNo": "{{selectLocationBin}}"
}
You’ll need the ParentObjKey from the response of this call.
Step 8: POST request to CreateReceipt.svc/CreateArrivalReceipt
Example Data Payload:
{
    "ParentObjkey": "[ParentObjKey from Step 7]"
}
If everything works correctly that should complete the receipt of the line.
Hope this helps.
- Author
- Sidekick (Customer)
- November 11, 2025
Hi
Disclaimer: I am self taught, and this is the result of hours of trial and error, so no promises.
Note: I’ll list all of the endpoints as projections, so for instance, the CreateReceipt.svc full path would be: https://[yourIFSserver]/main/ifsapplications/projection/v1/CreateReceipt.svc
Step 1: Build the CLOB data for the PO Line being received:
This is a long text string that is delimited by “^” characters, and includes a lot of the data for the line. Here’s an example of one:
["SOURCE_REF1=T12345^SOURCE_REF2=1^SOURCE_REF3=1^SOURCE_REF4=^SOURCE_REF_TYPE_DB=PURCHASE_ORDER^SOURCE_QTY_TO_RECEIVE=1^INV_QTY_TO_RECEIVE=1^CATCH_QTY_TO_RECEIVE=^LOCATION_NO=^LOCATION_TYPE_DB=^LOT_BATCH_NO=T12345-1-1^ENG_CHG_LEVEL=1^WAIV_DEV_REJ_NO=*^CONDITION_CODE=^RECEIVE_CASE=ReceiveIntoInventory^SOURCE_QTY_TO_INSPECT=0^QC_CODE=^NOTE_TEXT=^ORDER_CODE=1^INPUT_QTY=^INPUT_CONV_FACTOR=^INPUT_VARIABLE_VALUES=^PART_COST_LEVEL_DB=COST PER LOT BATCH^PACKING_INSTRUCTION_ID=^ADD_EMPTY_TO_PARENT_OPTION_DB=^RENTAL_DB=false^MANUFACTURER_ID=^MANUFACTURER_PART_NO=^;"]As you can see, i have entered my PO, Line, Release, Qty, etc into the string. A lot of the options are left blank. I could not find any documentation on this part, I reverse engineered this string from watching the calls happening in real time.
Step 2: POST request to CreateReceipt.svc/FndTempLobs to begin the process
Data payload:
{"CreatedByModule": "CreateReceipt"}You will need the ETag and the LobId from the response of this call
Step 3: PATCH request to CreateReceipt.svc/FndTempLobs(LobId='{lobId}')/ClobData
The LobId from step 2 should be substituted into the path above, You will also need to add an If-Match header to your request with the Etag received from step 2.
The body for this request is the text of the CLOB you created in step 1.
Step 4: POST request to CreateReceipt.svc/InsertSelection
Data Payload:
{
    "Source": "RegisterArrivals",
    "SelectionTempLobId": "[LOBID FROM STEP 2]"
}
You’ll need the LineGuid from the response of this call.
Step 5: POST request to CreateReceipt.svc/CreateReceiptSet
Example Data Payload (anything in [ ] brackets must be substituted):
{
  "PrintBarCodes": false,
  "PrintArrival": false,
  "PrintServiceabiliyTag": false,
  "PackingRule": "SingleHandlingUnit",
  "LineGuid": "[LINE GUID FROM STEP 4}",
  "ReceivedBy": "[ADD A USER ID HERE]",
  "ArrivalDate": "[THIS WILL NEED TO BE A TIMESTAMP]",
  "ReceiptReference": "[THIS IS A REFERENCE NOTE]"
}
You’ll need the ObjKey from the response of this call.
Step 6: GET request to CreateReceiptSet(Objkey='[ObjKey from Step 5]')/ReceiveLines
This will return a list of lines on the receipt (i think it should just be one because we’re making a single request). You will need the ObjKey for this line.
Step 7: PATCH request to CreateReceipt.svc/CreateReceiptSet(Objkey='[ObjKey for Receipt from Step Step 5]')/ReceiveLines(Objkey='[ObjKey for line from Step 6]')
Example Data Payload (You’ll need to sub in your own Locations/Warehouse/etc):
{
  "LocationNo": "{{selectLocationNo}}",
  "Warehouse": "{{selectLocationWarehouse}}",
  "BayNo": "{{selectLocationBay}}",
  "RowNo": "{{selectLocationRow}}",
  "TierNo": "{{selectLocationTier}}",
  "BinNo": "{{selectLocationBin}}"
}
You’ll need the ParentObjKey from the response of this call.
Step 8: POST request to CreateReceipt.svc/CreateArrivalReceipt
Example Data Payload:
{
    "ParentObjkey": "[ParentObjKey from Step 7]"
}
If everything works correctly that should complete the receipt of the line.
Hope this helps.
Glad to help. For what it's worth, ive almost completely stopped using BPAs over the last 12 months because I find them too convoluted to develop. I've moved on to automating everything with python and the odata layer.
+6- Sidekick (Customer)
- November 11, 2025
Hi
Disclaimer: I am self taught, and this is the result of hours of trial and error, so no promises.
Note: I’ll list all of the endpoints as projections, so for instance, the CreateReceipt.svc full path would be: https://[yourIFSserver]/main/ifsapplications/projection/v1/CreateReceipt.svc
Step 1: Build the CLOB data for the PO Line being received:
This is a long text string that is delimited by “^” characters, and includes a lot of the data for the line. Here’s an example of one:
["SOURCE_REF1=T12345^SOURCE_REF2=1^SOURCE_REF3=1^SOURCE_REF4=^SOURCE_REF_TYPE_DB=PURCHASE_ORDER^SOURCE_QTY_TO_RECEIVE=1^INV_QTY_TO_RECEIVE=1^CATCH_QTY_TO_RECEIVE=^LOCATION_NO=^LOCATION_TYPE_DB=^LOT_BATCH_NO=T12345-1-1^ENG_CHG_LEVEL=1^WAIV_DEV_REJ_NO=*^CONDITION_CODE=^RECEIVE_CASE=ReceiveIntoInventory^SOURCE_QTY_TO_INSPECT=0^QC_CODE=^NOTE_TEXT=^ORDER_CODE=1^INPUT_QTY=^INPUT_CONV_FACTOR=^INPUT_VARIABLE_VALUES=^PART_COST_LEVEL_DB=COST PER LOT BATCH^PACKING_INSTRUCTION_ID=^ADD_EMPTY_TO_PARENT_OPTION_DB=^RENTAL_DB=false^MANUFACTURER_ID=^MANUFACTURER_PART_NO=^;"]As you can see, i have entered my PO, Line, Release, Qty, etc into the string. A lot of the options are left blank. I could not find any documentation on this part, I reverse engineered this string from watching the calls happening in real time.
Step 2: POST request to CreateReceipt.svc/FndTempLobs to begin the process
Data payload:
{"CreatedByModule": "CreateReceipt"}You will need the ETag and the LobId from the response of this call
Step 3: PATCH request to CreateReceipt.svc/FndTempLobs(LobId='{lobId}')/ClobData
The LobId from step 2 should be substituted into the path above, You will also need to add an If-Match header to your request with the Etag received from step 2.
The body for this request is the text of the CLOB you created in step 1.
Step 4: POST request to CreateReceipt.svc/InsertSelection
Data Payload:
{
    "Source": "RegisterArrivals",
    "SelectionTempLobId": "[LOBID FROM STEP 2]"
}
You’ll need the LineGuid from the response of this call.
Step 5: POST request to CreateReceipt.svc/CreateReceiptSet
Example Data Payload (anything in [ ] brackets must be substituted):
{
  "PrintBarCodes": false,
  "PrintArrival": false,
  "PrintServiceabiliyTag": false,
  "PackingRule": "SingleHandlingUnit",
  "LineGuid": "[LINE GUID FROM STEP 4}",
  "ReceivedBy": "[ADD A USER ID HERE]",
  "ArrivalDate": "[THIS WILL NEED TO BE A TIMESTAMP]",
  "ReceiptReference": "[THIS IS A REFERENCE NOTE]"
}
You’ll need the ObjKey from the response of this call.
Step 6: GET request to CreateReceiptSet(Objkey='[ObjKey from Step 5]')/ReceiveLines
This will return a list of lines on the receipt (i think it should just be one because we’re making a single request). You will need the ObjKey for this line.
Step 7: PATCH request to CreateReceipt.svc/CreateReceiptSet(Objkey='[ObjKey for Receipt from Step Step 5]')/ReceiveLines(Objkey='[ObjKey for line from Step 6]')
Example Data Payload (You’ll need to sub in your own Locations/Warehouse/etc):
{
  "LocationNo": "{{selectLocationNo}}",
  "Warehouse": "{{selectLocationWarehouse}}",
  "BayNo": "{{selectLocationBay}}",
  "RowNo": "{{selectLocationRow}}",
  "TierNo": "{{selectLocationTier}}",
  "BinNo": "{{selectLocationBin}}"
}
You’ll need the ParentObjKey from the response of this call.
Step 8: POST request to CreateReceipt.svc/CreateArrivalReceipt
Example Data Payload:
{
    "ParentObjkey": "[ParentObjKey from Step 7]"
}
If everything works correctly that should complete the receipt of the line.
Hope this helps.
Glad to help. For what it's worth, ive almost completely stopped using BPAs over the last 12 months because I find them too convoluted to develop. I've moved on to automating everything with python and the odata layer.
Well you've earned a phone a friend from me anytime you need (value of said help could be questionable). As an imposter developer, AI vibe coding is definitely more compatible/useful in developing PL/SQL based solutions at this point for me. I'll say though, I've found BPAs to be helpful in spots where asynchronous execution is necessary, like a PO line change triggered action. Thanks again.
+6- Sidekick (Customer)
- February 26, 2026
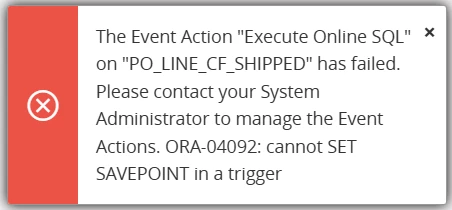
Update: I think I am a victim of further PL/SQL crackdown in 25R1. I believe API changes (to be more strict I assume) have broken my PL/SQL event action. So perhaps IFS putting us in even tougher spot with workflows not having enough capability and further aggressive lock down of using PL/SQL that could make up for those limitations.
+6- Sidekick (Customer)
- September 14, 2026
Update: It wasn’t a crackdown on SQL based event actions, it was addition of a SAVEPOINT to an API in the overall receipt API flow in 25R1. Workflows do not support standard APIs that contain SAVEPOINTS currently, nor SQL event actions.
The workaround involves utilizing REST APIs along with a service user. With our application of the receipt API (and using the REST workaround) I still found it necessary to introduce a separate stored procedure and SQL event action for one step to force a ‘separate session’ be recognized and process correctly.
Enter your E-mail address. We'll send you an e-mail with instructions to reset your password.