What is the name of the form/page, that comes after clicking the "new" button in 'product lookup' page. Is it possible to add any field validation there through UI designer ?
How the swap function works in FSM ? what are the mandetory parameters to complete a component swap ? Not able to do the final shipment with the issue "Parent unit cannot be marked for shipment when component repairs are in-process."
Best answer by Shageesha Prabagaran
SWAP :
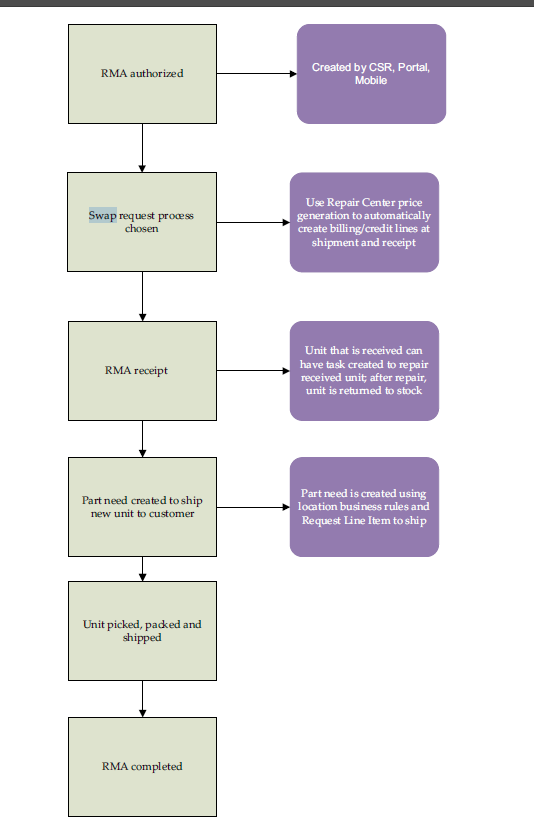
Swap is used when you want to receive an unusable unit from your customer and then ship a replacement, usable unit to your customer. The unit you send has a different serial number than the unit you receive and you generally charge a flat rate.
Swap process
Swap Procedure
1. Authorize units.
2. Create the RMA.
3. Enter the customer information.
4. For each type of unit, create a request line.
5. If the units have known serial IDs, enter the unit and serial ID information.
6. Using the RMA as a reference, receive the unusable units.
7. Pick and ship the usable units.
Application params related to Swap :
SWAP_CHILD_STRUCTURE_ON_RMA_PRODUCT_SWAP. If you use a swap process and product structures, you can choose to swap all of the child products when you swap the parent. To swap child products, set the value of this parameter to Y (yes).
SWAP_NEEDS_AT_RECEIVING. For a value of Y (yes), part needs are created for swap lines on an RMA when posting the receipt. For a value of N (no), part needs are created when parts are marked ready to ship on the Repair Center screen. The value you choose depends on how you manage your inventory.
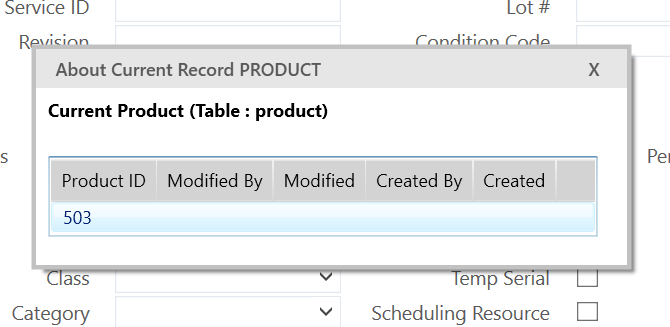
The screen name can be checked, when you select the About icon in the 'Product lookup Screen' or any screens in FSM application :
About Current Record PRODUCT : PRODUCT is the Screen Name.
Current Product (Table : product) : product is the Table name.
You can do the Table validations in the Custom Metadata (For customization Tbales) or FSM Metadata and also can check for the properties section under the UI Designer to change any Customization screens.
Explanation : The Properties tab is the other in the left‐most pane of the UI Designer. Properties you can view or change appear depending on the item selected. Any properties entered here apply to the particular new or customized screen only. For example, you might want a certain field label to appear only on the customized screen. For changes you want to apply to all screens, update the appropriate message or custom metadata.
Swap is used when you want to receive an unusable unit from your customer and then ship a replacement, usable unit to your customer. The unit you send has a different serial number than the unit you receive and you generally charge a flat rate.
Swap process
Swap Procedure
1. Authorize units.
2. Create the RMA.
3. Enter the customer information.
4. For each type of unit, create a request line.
5. If the units have known serial IDs, enter the unit and serial ID information.
6. Using the RMA as a reference, receive the unusable units.
7. Pick and ship the usable units.
Application params related to Swap :
SWAP_CHILD_STRUCTURE_ON_RMA_PRODUCT_SWAP. If you use a swap process and product structures, you can choose to swap all of the child products when you swap the parent. To swap child products, set the value of this parameter to Y (yes).
SWAP_NEEDS_AT_RECEIVING. For a value of Y (yes), part needs are created for swap lines on an RMA when posting the receipt. For a value of N (no), part needs are created when parts are marked ready to ship on the Repair Center screen. The value you choose depends on how you manage your inventory.
But, I was looking for a specific scenario, where, a Parent Product has 100 children (Few serialized and few are not serialized- all are controlled part). Now, I want to replace one faulty child part with new one.(serialized). While defining a new part during exchange I want a validation on serial no, so that no one can put a temp serial no as an exchanged part. But, rest of the children parts may contain temporary serial no.
So, even through we are pointing to Product table, but the name of form in UI designer don’t seem to be “Product” page.
Additionally, the SWAP process defined in Reference guide is working absolutely fine, if we are dealing with unit ID in repair page, but not for component repair.