Hello,
We are in the process of upgrading to IFS10. in IFS 8 we are still using the old field “Page Footing” in Company/Invoice/General”. Can anybody provide a useful documentation how “Document Footer” is intended to work?

Best regards
Johannes
Hello,
We are in the process of upgrading to IFS10. in IFS 8 we are still using the old field “Page Footing” in Company/Invoice/General”. Can anybody provide a useful documentation how “Document Footer” is intended to work?

Best regards
Johannes
Best answer by Yeshan Aluthgama
Defining a Field
In Document Footer->Define Filed, you can create a data by clicking new button and entering a value in the Field ID filed and entering a description in the corresponding Header Text field.
The description entered in the header will be printed above the listed field IDs. Information related to the field IDs are entered in the text area.
The System Defined check box is selected automatically for a system defined fields. E.g. Tax Number. This type of field cannot be modified.
Select the Free Text field check box to enter information in the text area if you want to print it in a single line under the footer. For example, the company web page or other information sent to the customer or supplier.
To define a general field, keep the Free Text checkbox unticked.
Likewise, continue creating the Free Text or General fields as required in order to create the footer.
Defining a Footer
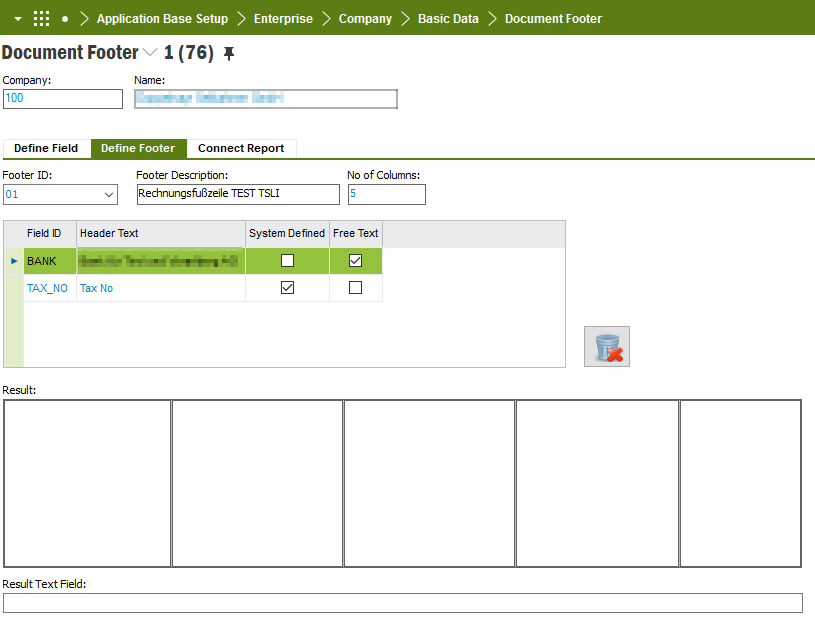
Enter an ID for the footer in the Footer ID field. Enter a description for the footer in the Footer Description field. Enter the number of columns that is required for the footer in the No Of Columns field and save.
All the field IDs created in the Define Field tab will appear in the list and the result will be created with the number of columns entered.
Drag and drop the different field IDs(System Defined, Free Text, General) into the Result view and create the footer. You have to drag them individually in to the columns in the order that you would like to display them in the document.
If a field ID should be removed, then it must be dragged and dropped in to the paper basket. If there are too many spaces between any of the columns, drag the mouse pointer over the column line and drag the line to the left or right.
Enter your E-mail address. We'll send you an e-mail with instructions to reset your password.